Here is my 1 gallon 14 litres Kombucha recipe, although I often make even more! Those looking for a ginger kombucha recipe have come to the right place, but ginger haters can just leave it out.
Let’s get the basics out of the way real quick. To make Kombucha, you mix sugar and caffeinated tea together. Then you put a specific bacteria and yeast combination (called a SCOBY) in the liquid which converts it to Kombucha over a period of a few weeks. Ready to drink! …unless you want your Kombucha to be fizzy or flavored. To get fizz, you transfer all but the SCOBY to air-tight containers, give the bacteria and yeast a bit more food (sugar), and wait a few more days. To get flavors, you add things like berries, fruits, spices, ginger, and coconut to the airtight container at the same time.
As for why I drink kombucha… there are three reason. Find them here.
My delicious, heavenly brew from my 1 gallon kombucha recipe. No, I don’t store it out in the desert sun… just brought it out for a photo shoot.
Now let’s have a look at the kombucha ingredients, how to make a SCOBY, and step-by-step instructions for making 1 gallon of kombucha.
Kombucha Ingredients
There are a few things you can’t live without if you’re making kombucha:
- Glass jar
You need a fermenting container, and glass jars are the most popular. Buy one like this or… get creative! I’ve used all sorts of things – old pickle jar, a ceramic pitcher, a wide-mouthed half-gallon Ball jar… After your first batch, you’ll be able to use a combination of small volume containers if you want. You absolutely can’t use any metal except stainless steel. I’m told metal will kill the organisms that work on the tea and sugar to make kombucha. I’ve also heard anything but food-grade plastic 1 and 2 are dicey because they can leach BPAs out of the plastic. And don’t use crystal, as it’s made with lead which will leach into your kombucha. Same goes for ceramic not meant for food – glazes often contain lead. If you happen to have a wooden vessel, some kombucha brewers swear by wood… but do your research! Or just go with glass! - Green or Black Tea
It’s important not to use teas with added oils, like Earl Grey. They can hurt the organisms that make the tea into kombucha. I really like this jasmine green tea;
.
The jasmine flavor makes it to the final product. - Sugar
You’re welcome to experiment, but I’ve been told the organisms that make kombucha really love plain white sugar. They’re eating most of it, not you, so you don’t have to be too concerned. You can try honey-kombucha or coconut-sugar kombucha or maple-syrup kombucha or agave kombucha… but I love my kombucha too much to risk a failed batch. I use this kind of organic cane sugar. I’ve read that ~20% of the sugar remains, making kombucha a low-sugar – not no-sugar – drink. There is 16x more sugar in grape juice, 9x more sugar in coca cola or apple juice, 7x more sugar in orange juice. A lot of people want to know how to make kombucha without sugar, but that’s like asking how to keep an animal alive without feeding it. Kombucha is the byproduct made by certain strains of yeast and bacteria when they eat sugar and caffeine. - a SCOBY
(see below) - a breathable lid
Think towel, coffee filter, cheesecloth… anything that lets air through but can be rubber-banded around the rim of your brewing container to keep bugs out.

There are a few other things you don’t have to have, but they sure improve the ease and quality of my kombucha-brewing life:
- Flip-top bottles
To get fizzy kombucha, you have to do a second fermentation in airtight bottles. The fizz comes from carbon dioxide the yeast produce when they metabolize sugar. If you use screw-top bottles, the pressure usually increases until the gas escapes… no fizz! Flip top bottles like this keep the gas trapped and force it into the kombucha for fizzy deliciousness.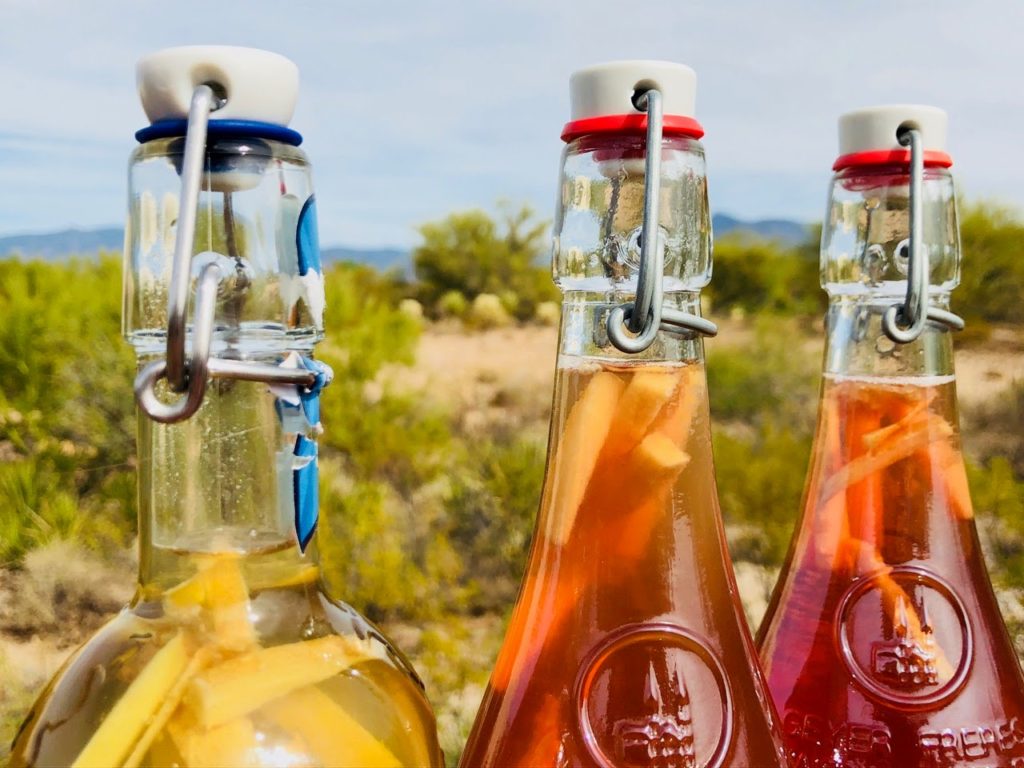
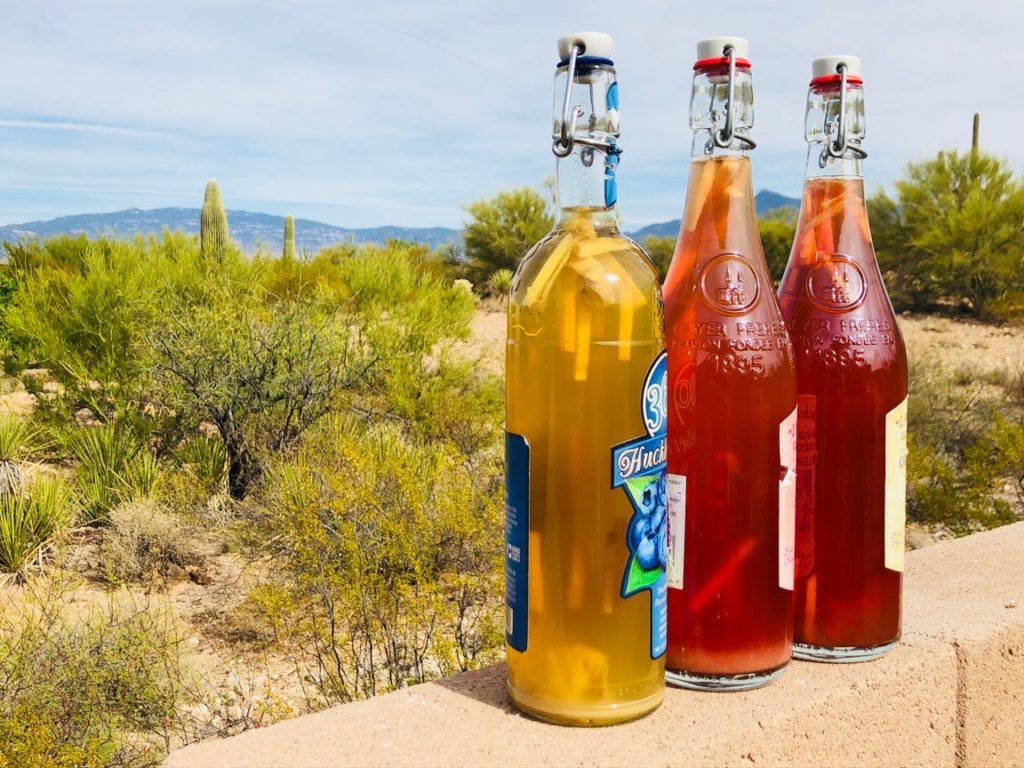
Flip top bottles are important for anyone who wants to make kombucha that is fizzy and flavored. You don’t have to buy your bottles. There are plenty of beverages out there that come in these bottles. Pictured here: 360 Huckleberry Vodka bottle and L’authentique Sparkling Lemonade bottles.
- Strainer or cheesecloth filter
I actually don’t strain my kombucha all the time, because I’m lazy. However, if the floaty bits and eventual sludge gross you out, a cheesecloth filter is your best friend. I’ve also used a fine-mesh kitchen strainer. My time-saving shortcut is just to leave the dregs in the bottle and with the last 1/4 c. of kombucha. - Funnel
If you want fizzy kombucha and are using narrow-necked bottles, a funnel like this is a big time saver. Otherwise, I pour the brewed kombucha from the jar into something with a pour spout – like this – and carefully pour it into the bottles. - Fruit and other flavorings
More power to you if you just want plain kombucha. It will certainly make your life more simple. For the rest of us, think fruit and spices. - Bottle brush
I would absolutely not buy one of these. The house where your humble nomad brews most her kombucha happens to have one, so I use it. I think it works just as well to clean the flip-top bottles with soap and warm water just as soon as you finish them off.
How do you make a SCOBY?
You can’t make kombucha without a SCOBY. What is a SCOBY? A cute acronym for an ugly creature. SCOBY = symbiotic colony of bacteria and yeast. But not just any bacteria, and not just any yeast. If you followed this recipe but didn’t use a SCOBY, you’d probably get sick. Why? A SCOBY has the right bacteria and yeast that eat the sugar and caffeinated tea that are the foundation of this drink. In the absence of the “right” bacteria and yeast from a SCOBY, the “wrong” bacteria and yeast ambient in the environment will instead feast on the sugary caffeinated water. The products from the “wrong” bacteria and yeast (or the “wrong” bacteria and yeast themselves) might make you sick in the same way the food left out too long can make you ill.
So how do you make a SCOBY?
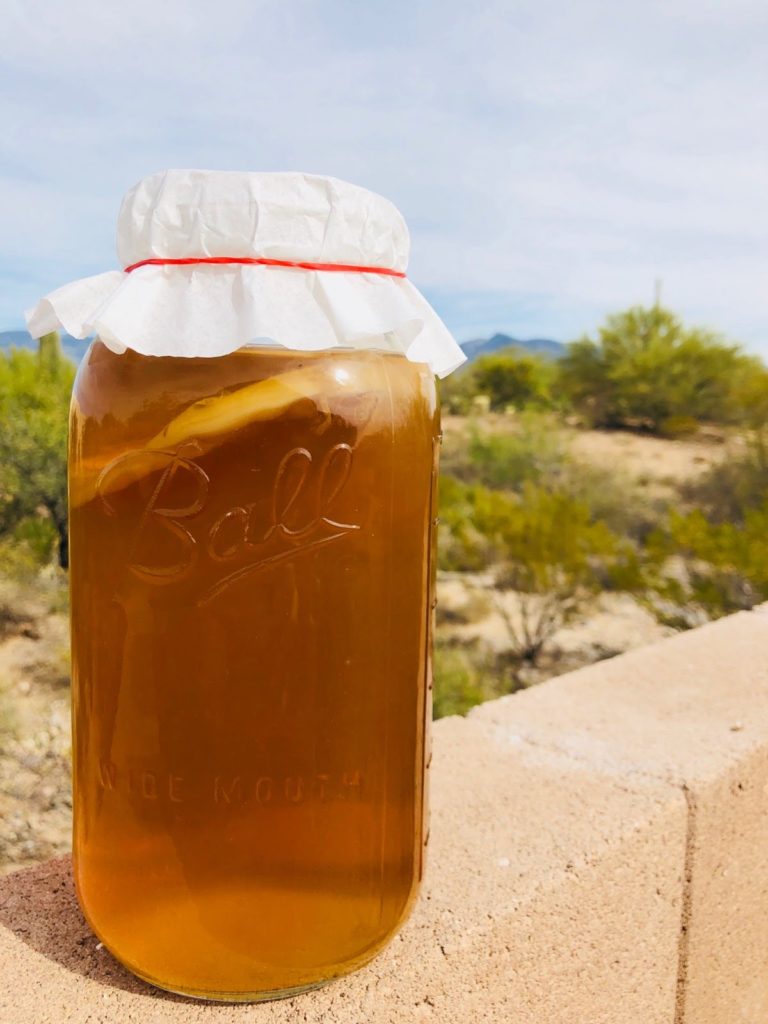
Thousands of people just buy a kombucha starter kit or a mail-order scoby, but you can make your own! Pictured here – a batch of my kombucha mid-brew. The old scoby is the big one. If you look hard, in one place you can see the new SCOBY forming on the surface of the liquid. (I don’t keep it outside in the sunshine. I just brought it out of the warm, dark cupboard for a quick photo shoot.)
While the quick thing to do is just buy a SCOBY, an intrepid DIYer like myself is going to want to make their own. And it’s easy!
Get a bottle of plain, raw kombucha from the store. Plain because flavorings can affect the health of the SCOBY. Raw because the SCOBY is alive. If you get pasturized kombucha, that means the bacteria and yeast that make up a SCOBY (and are required to make sweetened tea into kombucha) are not present.
Brew a cup of black or green tea and stir in a few tablespoons of sugar. Once it has cooled, pour both the tea and the bottle of your store-bought kombucha into a jar. (To really get all the good stuff out of the store bottle, I pour in the store kombucha, then I “rinse” the store bottle by pouring the sweet tea into the empty kombucha bottle and then into the final glass jar.) Rubber-band a breathable cloth or coffee filter around the opening of the glass jar and let it sit undisturbed in a dark place – bonus points if it’s also warm – until a new scoby at least 1/4″ thick has grown on the surface. In warm environments, this can happen in a week. In cooler environments it can take two weeks, maybe even three. If you don’t have anything after four weeks, toss it out and try again.
Phase 1: 1 Gallon Kombucha Recipe
Here’s how to make kombucha like me:
Gather:
- 3 liters (qts) of water
- 7 green or black tea bags
- 1 c. sugar
- 2 c. kombucha
- 1 SCOBY
- 1 glass jar – gallon or larger
- 1 towel, coffee filter, or cheesecloth, etc.
- 1 rubber band
- 1 pot to boil water
If your container is bigger than a gallon, you can do 4 quarts water. If you grew your own SCOBY, the 2c. of kombucha is just the liquid that you grew the SCOBY in (although it will probably be more vinegary and sour than you’d want to drink). You can use tap water, but some say chlorine in tap water is bad for the SCOBY. If you don’t have a filter, just let it sit for several hours (up to 24) and the chlorine will off-gas out of the water.
Do:
- Brew tea (can brew in fermenting vessel), stirring in sugar until it dissolves.
- Let cool to room temp.
- If you didn’t brew tea in your fermenting vessel, pour the sugary tea into it.
- Add kombucha and SCOBY. Don’t let the liquid level get too close to the top of the jar, or you might find your SCOBY touching your cover and then the cover wicks sugary tea outside the jar and all over whatever surface your fermenting vessel sits on. (Ask me how I know.)
- Rubber-band a towel or coffee filter over the jar opening so it keeps out bugs but lets in air.
- Place in warm, dark place. Wait 2-3 weeks. Warmer temps will result in kombucha that’s done more quickly. You’re brewing to taste, so after about 10 days, you can taste test with a clean spoon. If it’s too sweet, let it continue to ferment. If it’s too sour, keep track for next time and check it sooner. When a new SCOBY has grown about 1/4″ thick on top, mine is usually the way I like it.
- If you like the flavor, you’re done! Set aside the SCOBYs (you’ll have two now) and 2c. of kombucha per gallon you plan to brew. You can strain the kombucha through a filter, store it in the fridge, and drink at your leisure. It lasts at least a few weeks, but I wouldn’t know the max storage length… I drink mine too fast!
- If it got sour on you or you want fizzy or flavored Kombucha, set aside the SCOBYs (you’ll have two now) and 2c. of kombucha per gallon you plan to brew. Then move on to Phase 2.
Phase 2: 1 Gallon Kombucha Recipe
Here’s how to make kombucha that’s fizzy and flavored:
Gather:
- 1 and 1/4 c. minimum of whatever sweet ingredients you’re using for flavor
- 1/3 c. minimum of any non-sweet flavor ingredients you might be using
- 2 to 3 and 1/2 quarts of kombucha from Phase 1
- 4 flip-top bottles or other airtight containers
- 1 Strainer or cheesecloth
- 1 Funnel
You could make a different flavor in each bottle, or you could make all your bottles the same. Out of laziness, I usually do all one flavor. I use about 2 TBSP of ginger (chopped into “matchsticks”) in each bottle, no matter what the other flavors are, for two reasons: I like it, and a friend told me it’s her go-to secret for always getting fizzy kombucha.2Something about the wild yeast on the ginger skin? If your air-tight containers are of varying size, just make sure you have enough to fit most of your kombucha. Screw-top containers are generally NOT airtight.
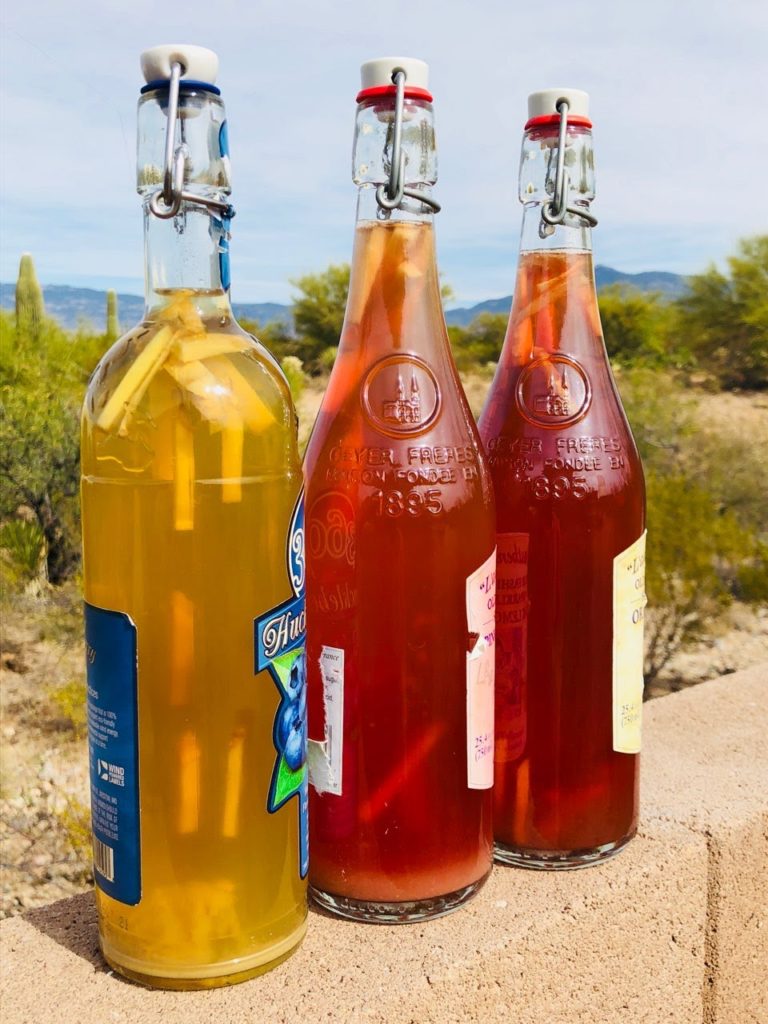
You can see the ginger “matchsticks” floating in each bottle. I actually have three kombucha flavors going in this picture – unusual for me! On the left is a lemon ginger made from the syrup leftovers of a batch of alcoholic ginger beer I just started – that’s a whole other post. The middle is prickly pear (a desert fruit I harvested with my family and made into a syrup) and ginger. The right is a combo of the latter two… so prickly pear lemon ginger?
Do:
- Put at least 1/4 c. of the fruit or syrup or juice you’re using into each jar. If you aren’t wanting any fruit flavor – e.g. anyone looking for a pure ginger kombucha recipe – make simple syrup and use that.
- Put in 1-2 TBSP of any non-sweet flavorings you’re using. Ginger, cardamom, cloves, cinnamon sticks… For me, when it comes to ginger there’s no such thing as too much! Okay, more than a 1/2c. of ginger matchsticks might be too much. Pro tip: I also smash my ginger matchsticks with the butt of the knife (carefully!) to maximize the ginger surface area and ginger goodness in my kombucha.
- Strain your kombucha through cheesecloth to get out all the floaties and sludge (optional – I’m usually too lazy to do this).
- Fill bottles leaving a small air gap of about one inch at the top. Err on the side of smaller vs. bigger. I’m told gas has more room to expand in air than in liquid, and a bottle with a big air gap is more likely to explode. Pro tip: try not to get any kombucha on the bottle lip. It can be a bit sticky, which makes burping the bottles (see 5.1 below) a tad more nerve-wracking.
- Seal bottles and wait up to 10 days.
- If swing top, check carbonation levels each day to prevent explosions. (In fermentation, releasing the pressure from the bottle is called “burping.”) Usually if lots of gas escapes when I open a bottle, I taste the kombucha. If it’s still too sweet, I close it up and let it keep fermenting. If it’s just right, I seal it up and let it ferment one more day just to get it good and carbonated. Then I stick it in the fridge without opening it to slow down the fermentation and carbonation production.
- If using permanent seals, you need to make a plastic test bottle, you won’t be able to taste-test, and you should probably only make one flavor. That, or make a test bottle for each flavor, because I’ve seen different flavors carbonate at radically different rates. To make a test bottle, get a small empty soda or water bottle, add the flavorings, then fill with kombucha leaving a small air gap at the top. Each day you can squeeze this bottle to see how much the brew has carbonated. When the bottle is hard, put the kombucha in the fridge and begin consuming. You can’t taste-test, because the plastic bottle needs to be a representation of how much pressure is in the other permanently sealed bottles. If you open it, gas will escape and you won’t know how close your other bottles are to exploding. It’s up to you if you consume the kombucha in the test bottle. I’ve been told kombucha is healthy because it leeches toxins from it’s surrounding… good if we’re talking about your body, bad if we’re talking about something stored in plastic.
- Take the kombucha from phase 1 that you set aside and use it along with phase 1 directions to get your next batch of kombucha brewing. You can use your better SCOBY and throw the other one away. Or if you reserved 4 c. from phase 1, you can now make 2 gallons of kombucha!
That’s it! If you’re itching to get kombucha in your belly, you can save a week by buying a SCOBY. If you don’t want to gather up all the gear… you can consider a kit that contains everything. If you don’t have a glass jar and can’t be bothered shopping for one, then this jar + SCOBY combo is popular.
For more on the science behind how kombucha works, I love this article. And here’s Why I Drink Kombucha.
Happy Brewing! ♣
You might also like:
Replace Most Your Toiletries with One Natural Ingredient
Why a Hard-Working Perfectionist… Doesn’t Want a Job


Twitter Facebook Google+ StumbleUpon Reddit Pinterest