Ever walked out of a glass art gallery wondering which crazy-face made up price tags in the thousands?
While much of art’s value is in the eye of the beholder, I discovered glass pieces have a potentially higher stake in the objectivity department.
Why?
Let’s saunter over to the comfortable territory of alcohol for a metaphorical comparison.

An acceptable life-water, courtesy of “swanksalot” on Flickr.
Why is whiskey — the water of life — more expensive when it’s aged 15 years vs. a time too short to boast about on the label? Why, in 2020, can a fancy bottle of wine made right now cost an extra $1,000? Time and space, my friends.
For the best whiskey, add up the months the oak dries and seasons after it is felled and the years of rent paid while it sits in casks. For the nicest wine, add up the hours of hand-selecting the best grapes, the days hand-processing, the months of seasoning the oak barrels, and the years it takes up expensive-to-maintain, temperature-controlled space.
And so it is with glass. Time and space!
Now, allow me one other tangent.
If you’ve never had the foolish pleasure of accidentally changing the temperature of glass too quickly — e.g. pouring warm beer into a stein fresh out of the freezer, or an oven-fresh baking dish slipped thoughtlessly under the faucet — you’re missing out on an attention-grabbing show. Spoiler alert: often the glass fractures violently.
A similar thing can happen in the world of glass art. When glass is in the process of becoming a striking piece of visual awe, it’s heated to lava temperatures. Really. 2000 °F. 1200 °C. As hot as lava.
Guess how many therms and kilowatt hours went into these babies?
Once the artist finishes a piece, they could chuck it on the counter, like cookies out of the oven, tapping a foot impatiently until cool enough to handle. However, room temp is around 70 °F, 21 °c. So, the new glass is roughly one to two thousand degrees hotter, depending on your °F/ °C thermal persuasion. If a temperature difference of under a hundred degrees will shatter glass, surely the thousand-degree difference would generate some bomb-like forces.
Bottom line: the molten glass needs to be slowly cooled, especially if it’s thick. Glass is a natural insulator, so the center of a big hunk is essentially wrapped in dozens of very effective blankets. The fancy word for slow-cooling glass is “annealing.” Ironically, to cool down a lava-hot item slowly, you need to”¦ heat it. Or rather, keep it hot, then gradually bring down the temperature. I’m sure you’ve heard of thousand-plus degree ovens — generally known as kilns. The glass goes inside a hot oven to cool (weird!). Once cooled, it can be slung out onto the gallery shelf and assigned a price tag with a few zeroes.
How long does the artist have to wait for their metaphorical “cookies” to cool? How long does the glass piece take up oven space? How many hours of oven-power are required?
For a small, solid piece, the answers are “days” and “up to 100.” Two to four days waiting, two to four days taking up space in the oven, forty-eight to ninety-six hours running the oven non-stop.
Most badass novice glass assistant ever.
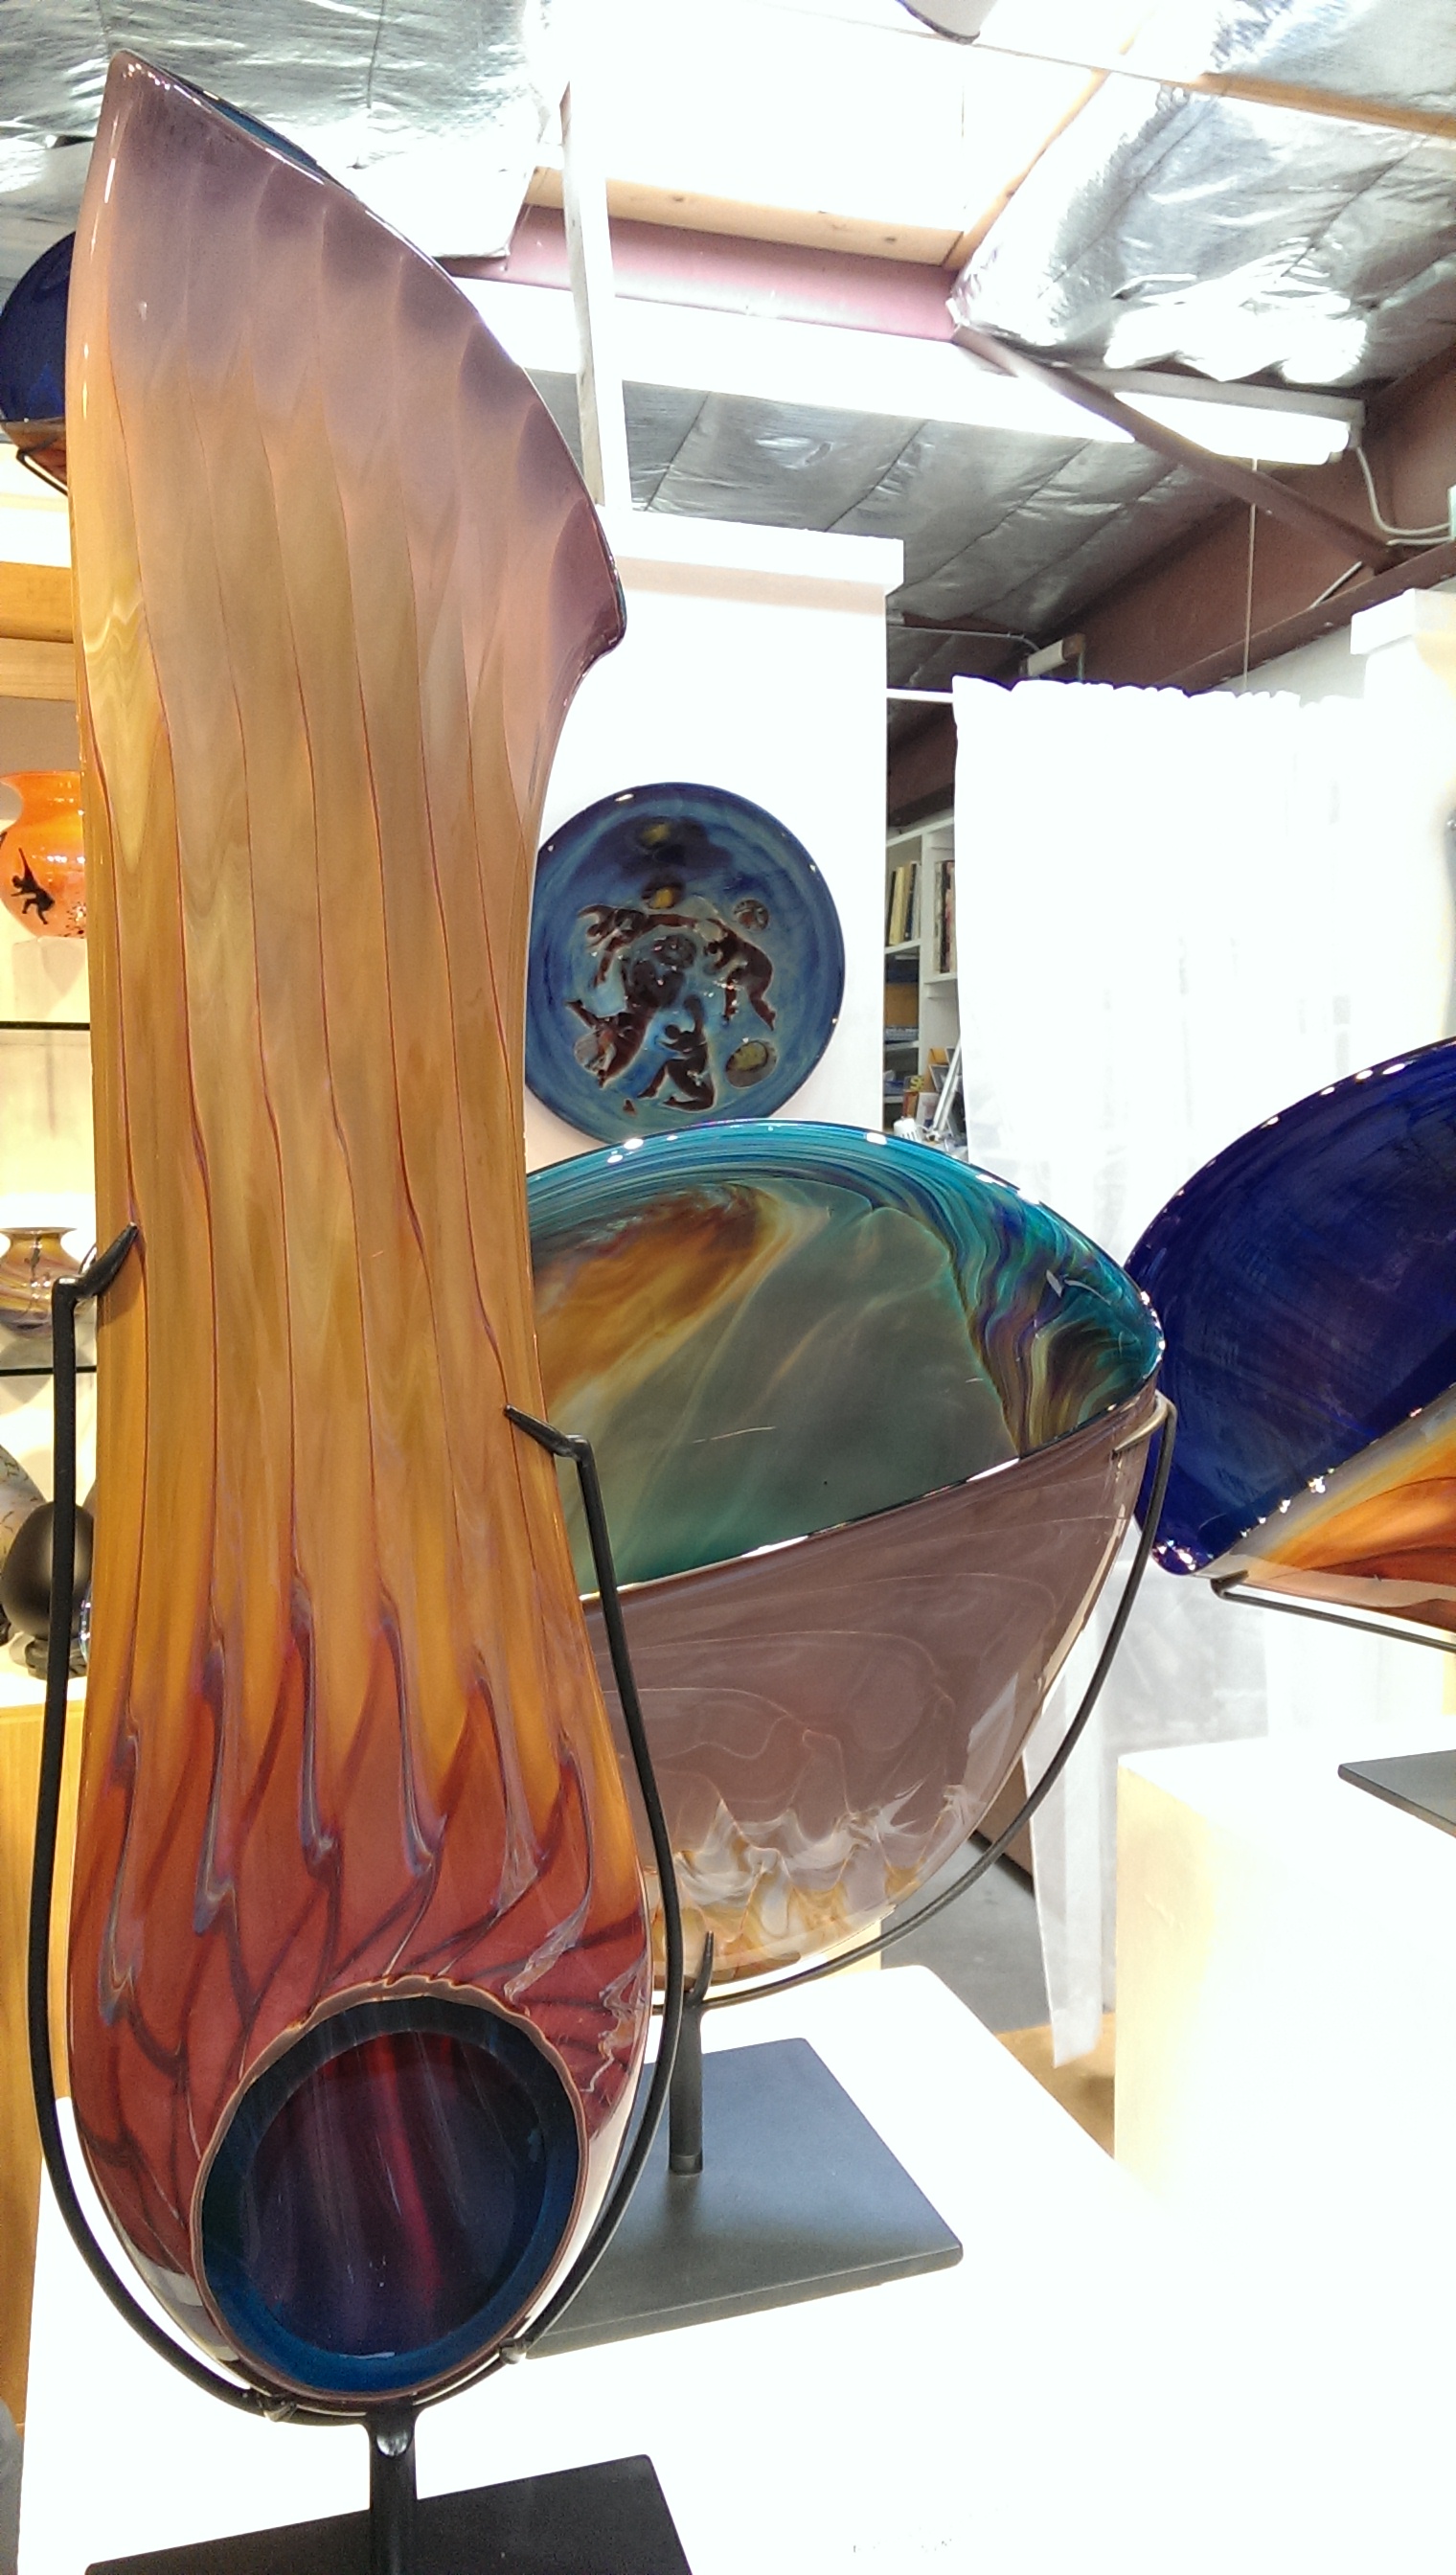
Okay — and those big, solid pieces? The ones with all the zeroes on their price tags? Not only do they require up to five staff to assist the artist while being created, but they have way bigger waiting numbers. And way bigger oven numbers. Up to a year. Imagine your utility bill if you ran your oven constantly for an entire year. Now imagine the cost of a high-powered oven that can actually endure being left on for an entire year. Takes the cynicism about ridiculous prices of “art” down just a notch, hey?. Like fine whiskey and fine wine, gorgeous glass takes up lots of time and space.
How do I know all this, and am I a glass artist in disguise trying to guilt you into buying all my beautiful art?
I wish.
It’s been my dream for years to take a glass blowing class. Boyfriend surprised me while we were living in New Mexico for a month with a one-day glass class. Obviously one cannot learn any art in a half-day session, so this was a taste-of tutorial. We all got to select colors and designs, handle our glass pieces during the times no cultivated talent was required, and act as the head artist’s assistant — holding moulds, etc. — when a quick, trained touch was imperative.
They called the gorgeous, fruit sized orbs we produced “paperweights” — an antiquated, un-sexy term that now just serves to describe an object of a certain size and heft. Trust me — these were very sexy “paperweights.”
How To Make A Sexy “Paperweight”
The really short version: pick up some molten glass, add layers of color and clear while heating and shaping when needed, add fancy effect with tools, use a wooden mold to achieve the final shape, break it off the rod, and put it in the oven to cool for a few days.
- Get Beautiful
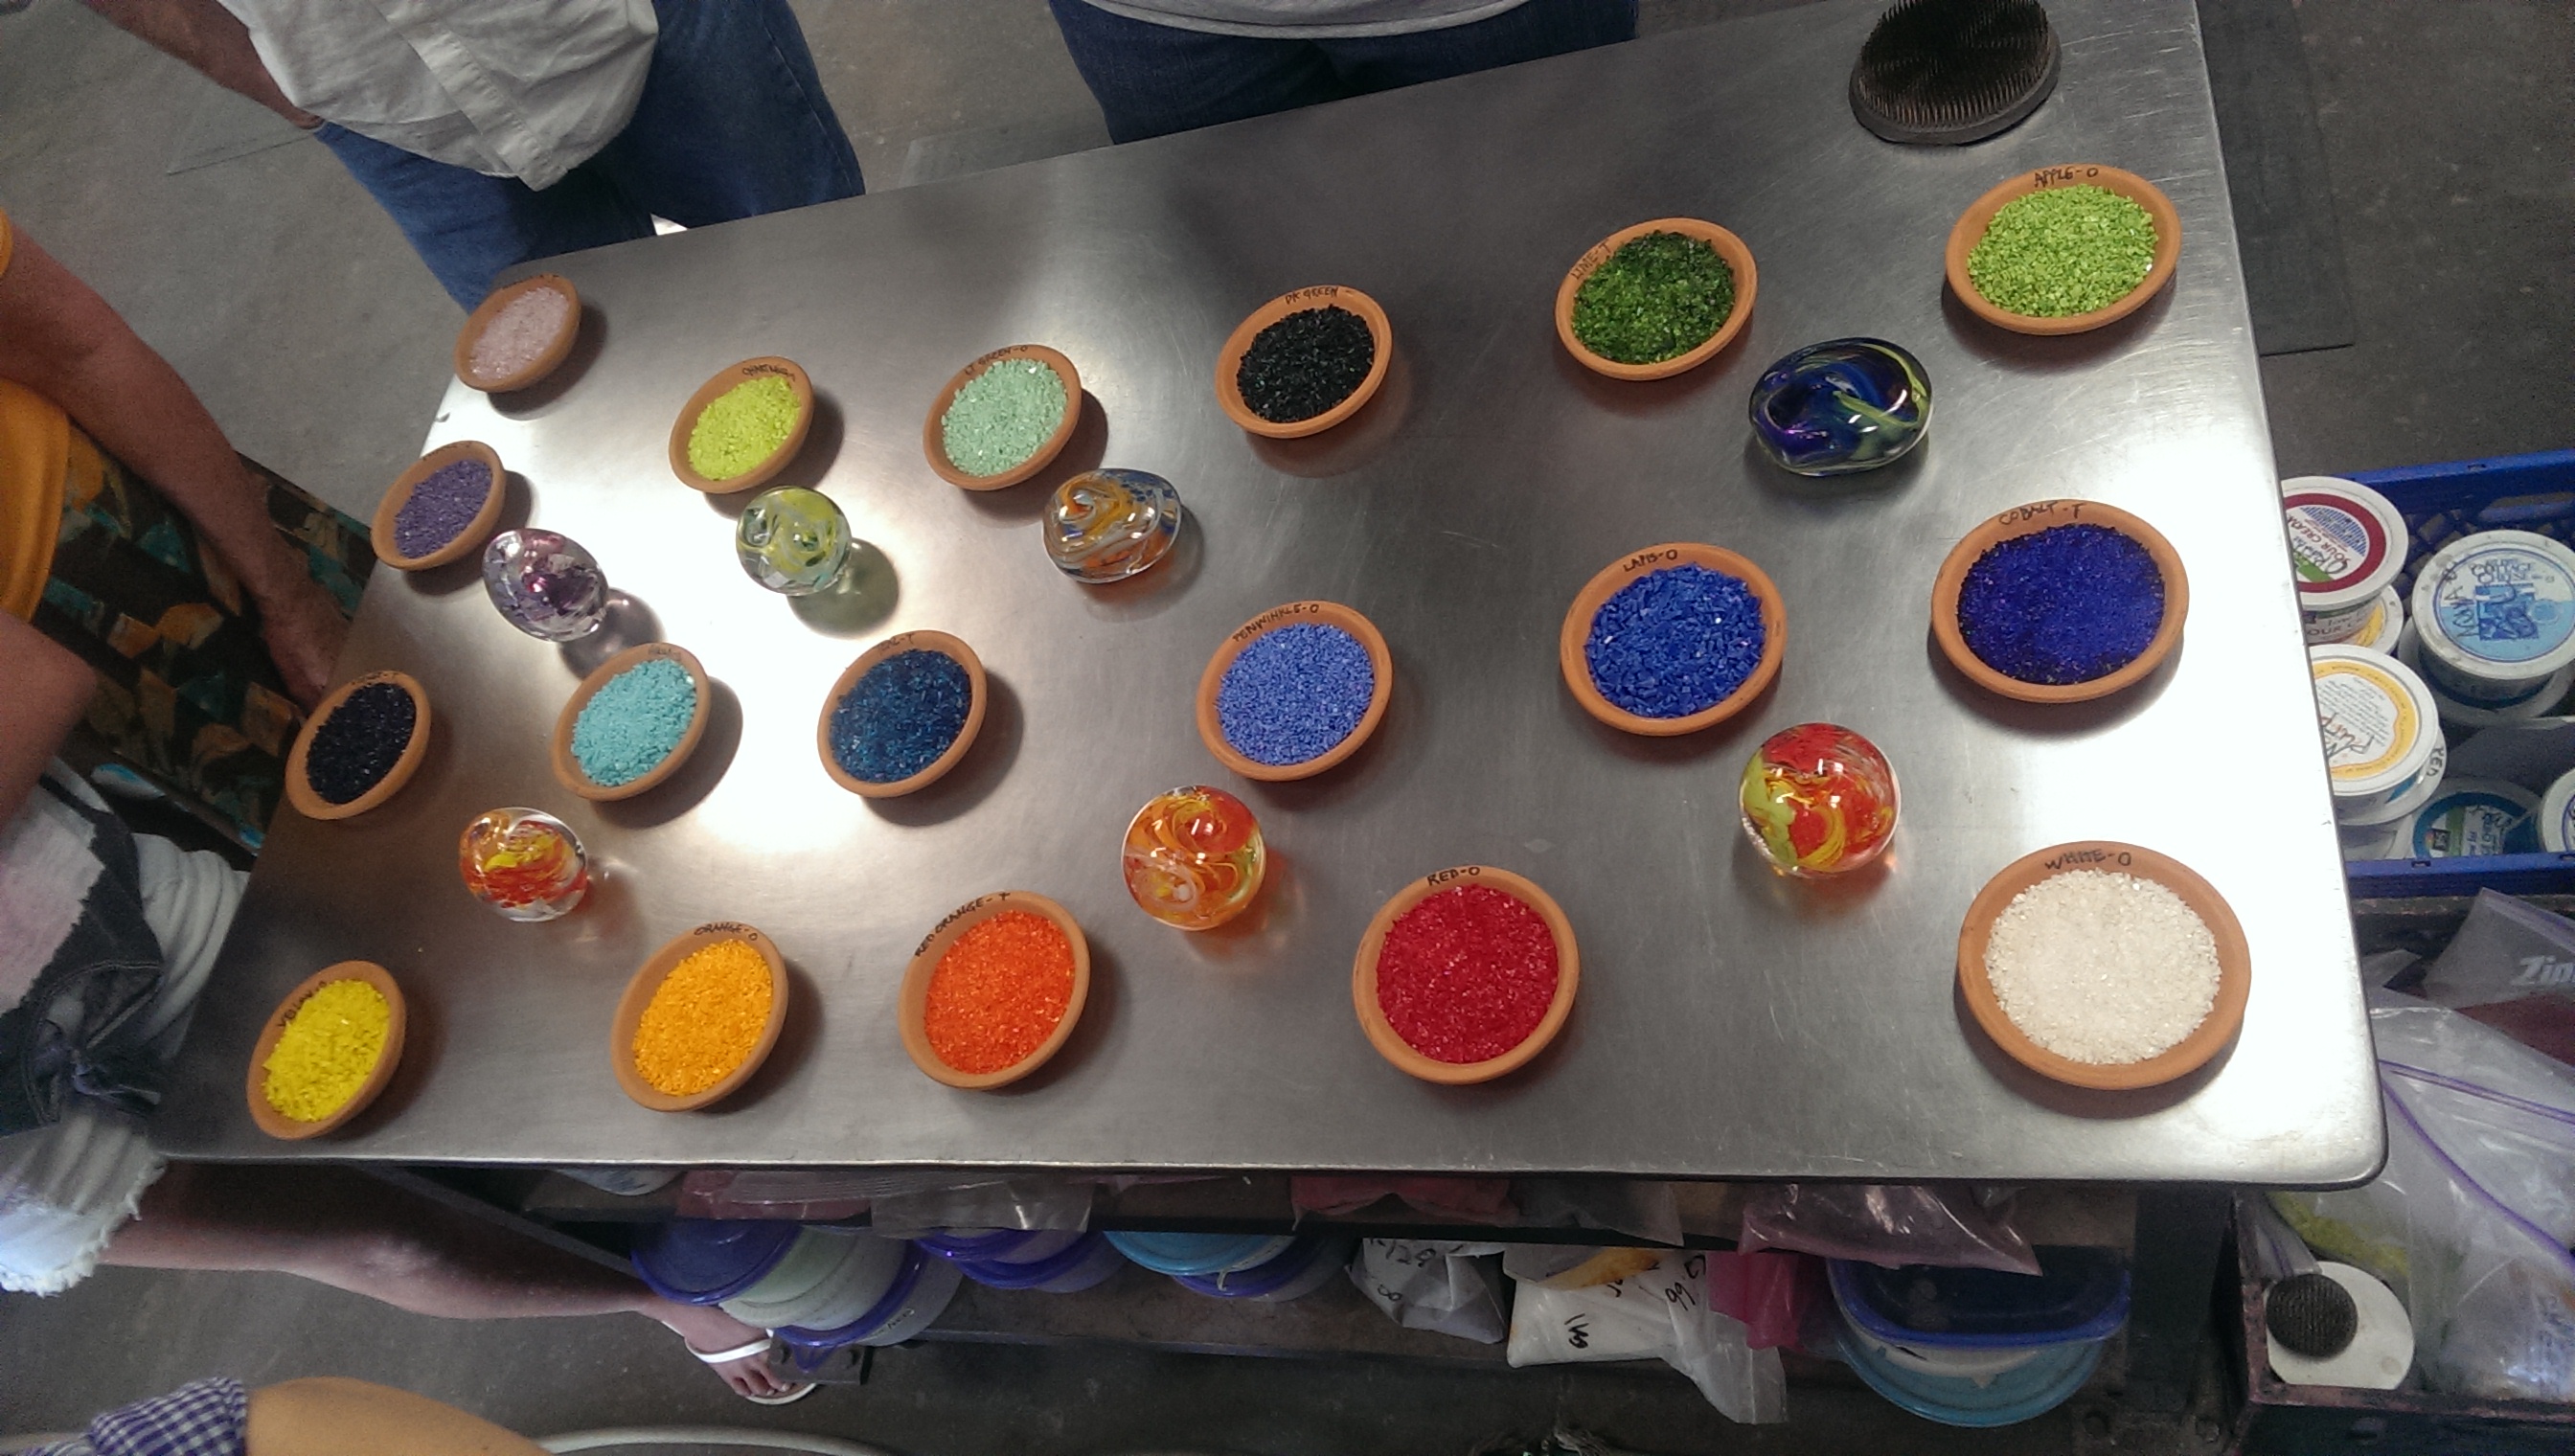
A rainbow of choices.
Colored glass is made by adding metal to molten glass. At the start of our turn, we selected three or four dishes of pre-made, colored glass pieces. Most participants followed the recommendation of at least one opaque color, one or two translucent colors, and the use of white to make the color “pop.”
- Pick up some glass
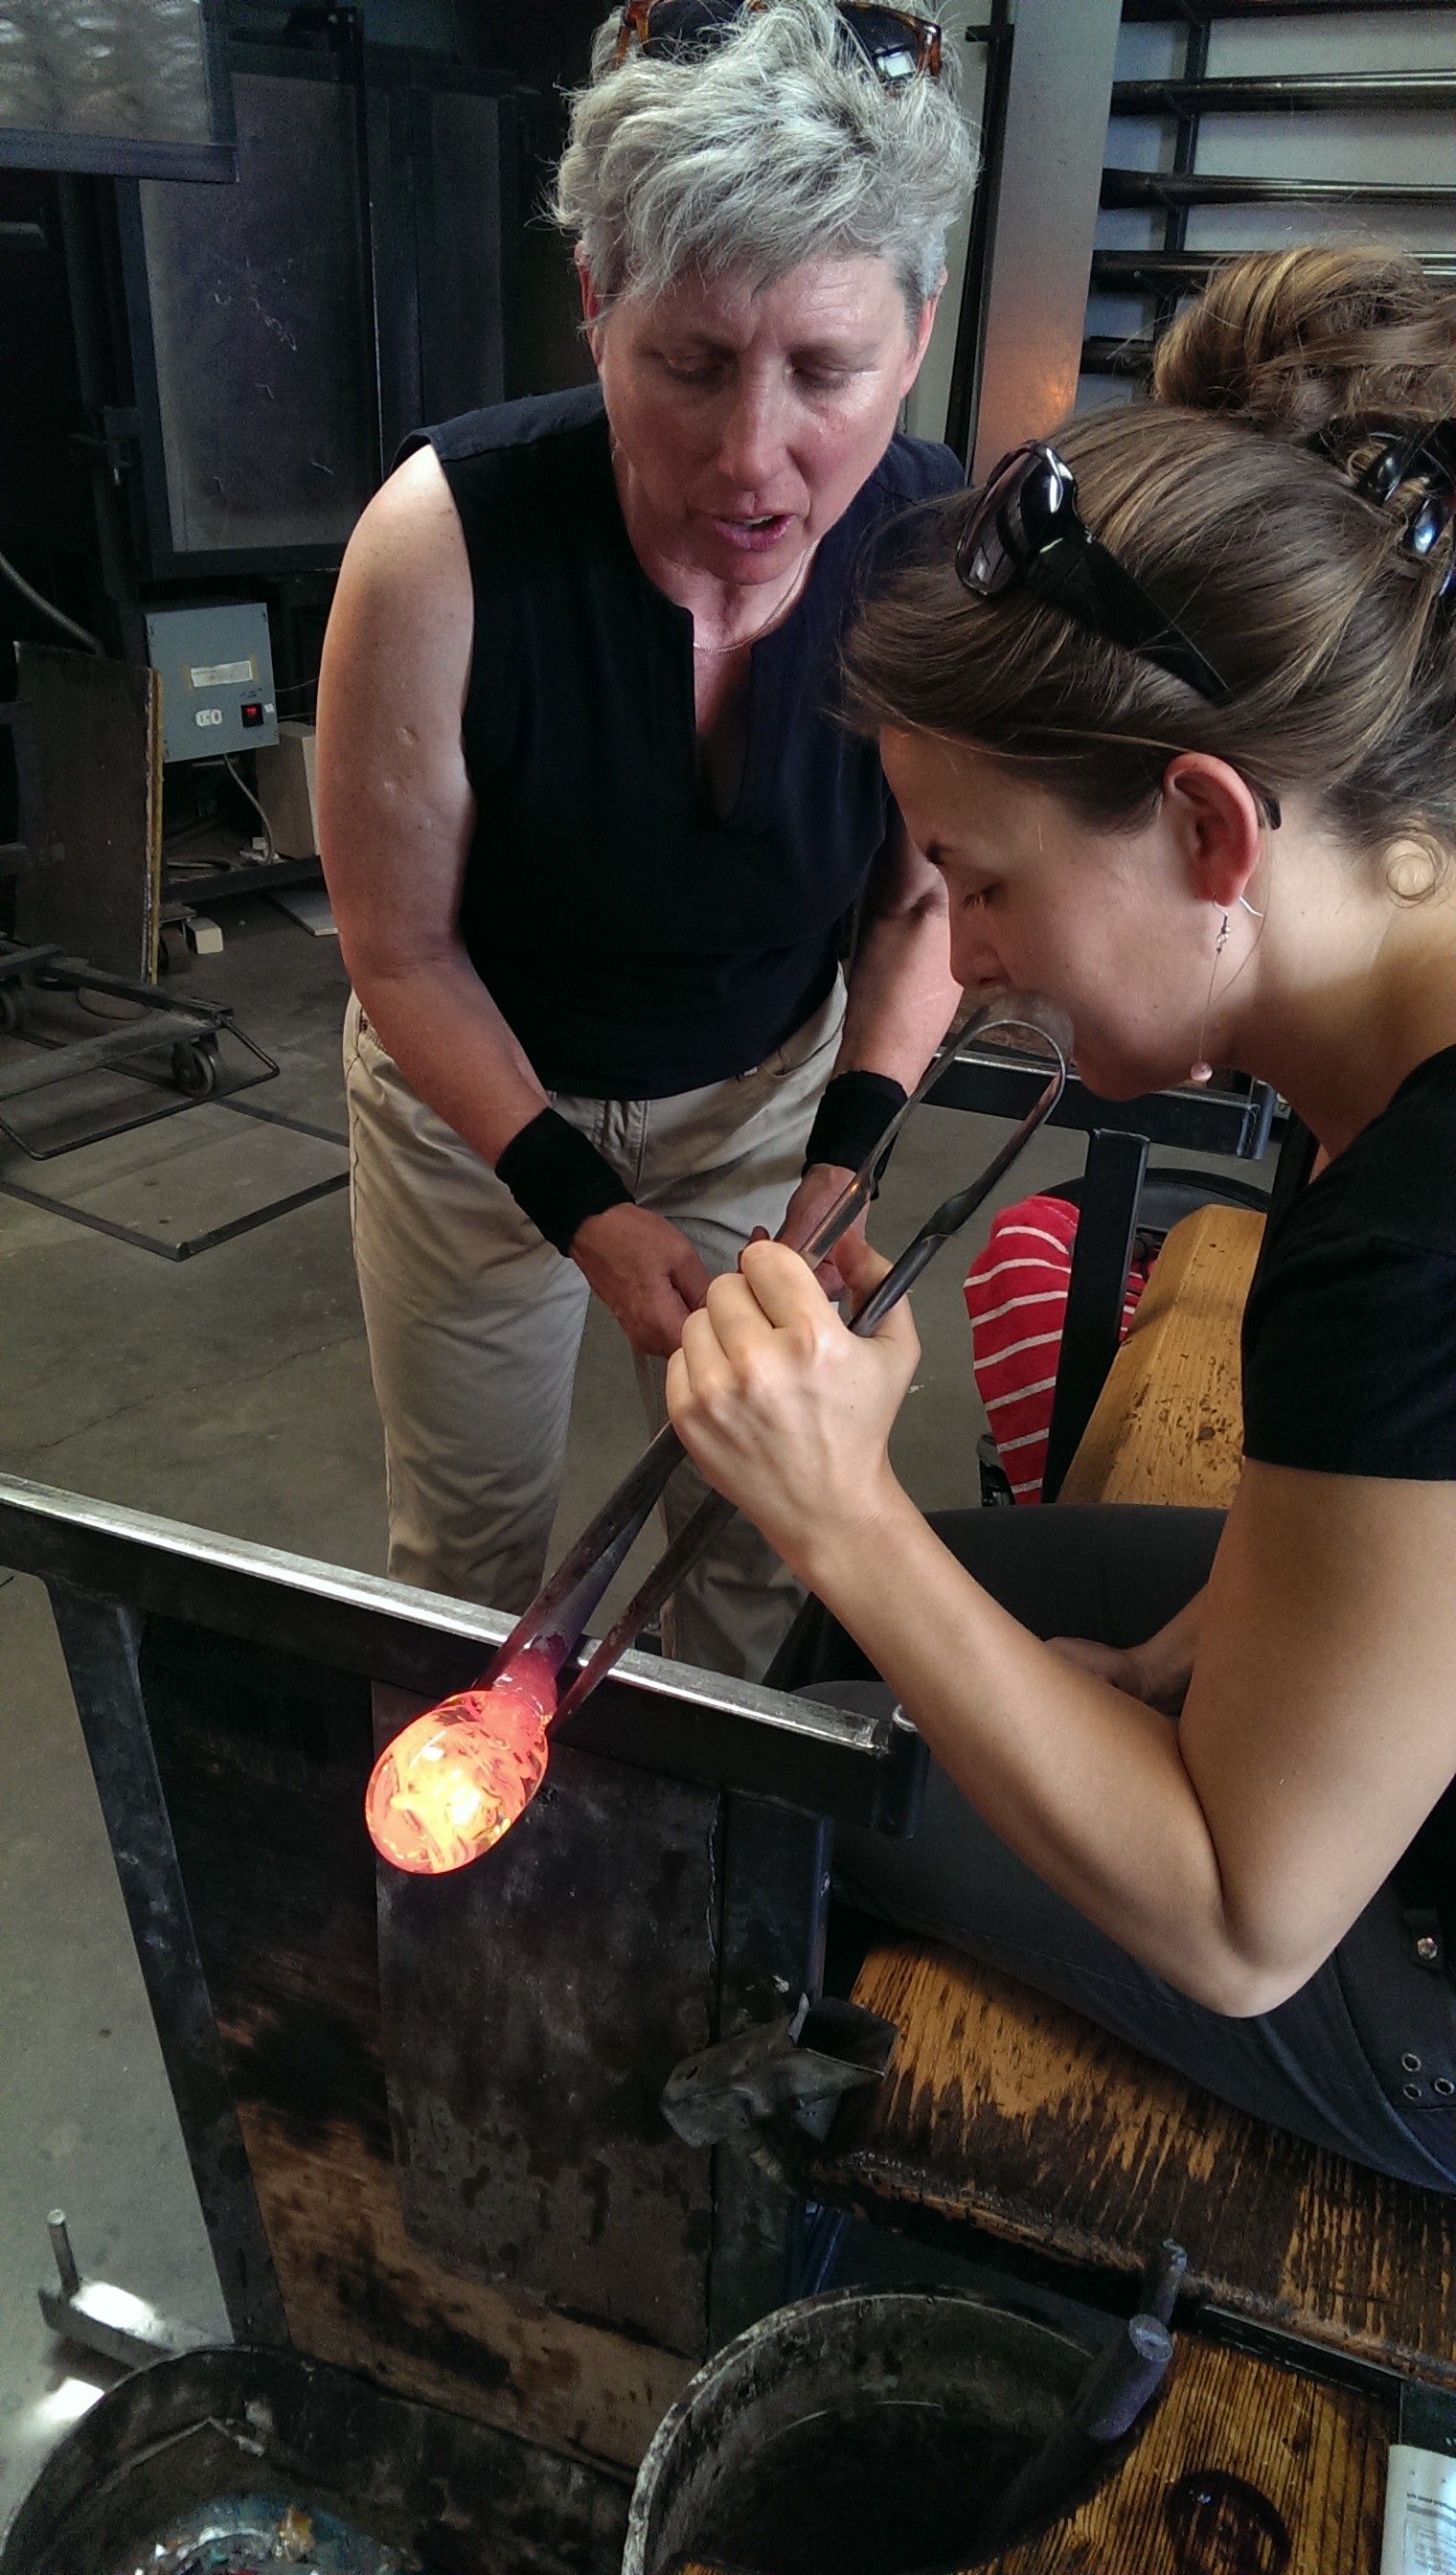
A step too dangerous and difficult for the untrained, our instructors braved the roaring furnace and dipped into the (clear) glass pots on our behalves. To create a cylindrical foundation to build on, a V-shaped rod rest was used. Recirculated water cooled the metal rod while constant rolling shaped the glass as it cooled from runny honey to warm caramel thickness.
- Go to the Glory Hole

Boyfriend takes on the “Glory Hole”
Time to get our hands dirty! We took possession of the rod, re-heated the glass to workability in “the glory hole,” tried desperately not to let it ooze so far to one side that it dropped off, removed it from the glory hole, rolled it quickly back into shape on the steel table, and dipped into the waiting colored glass shards — one color on each side. Then, back to the glory hole to melt in the colored glass, more rolling and shaping, then a layer of clear glass to protect the colors.
- Taffy Time
To obtain captivating swirls instead of colored blobs our instructors maintained the cylindrical shape of the oozing glass while we cut the tip of the blob in two, twisted the resulting “horns” into a DNA-helix with pliers, and returned for another layer of clear glass.
- Find Your Flair
After more rolling, heating, and adding the last layer of color, it was time to add funky features. While our wonderful instructors maintained the shape of the glass, we poked with pliers to create internal bubbles and rolled the surface across a pad of metal pins to achieve abstract swaths of tiny dots.
- Which Shape Wood You Want?

Cut quickly! The glass goes from honey to taffy to stuck as the seconds tick quickly past.
While the instructor picked up a final layer of glass, we grabbed the wooden mold (made of fruit wood!) we’d chosen to finalize the shape of our piece. We sat at the bench and worked the mold, following her time-sensitive instructions as quickly as possible while she rolled the cooling piece.
- Every Good thing must come to an End
Once the shape was right and before the glass had cooled too much, we squeezed the base with giant metal tweezers while the instructor continued her rolling. Once we drastically reduced the thickness of the base and scored the future break point, we made our way over to a bowl filled with high-temp ceramic fibers (sort of looked like insulation). A few good whacks and the piece dropped into the downy fluff. Then our bad-ass instructor (Elodie) busted out her blow torch, heated the break-off point to malleability, flatted the base with a tool, and quickly chucked it into the kiln to cool for a few days. (Otherwise, as previously mentioned, the thermal shock would cause the sexy paperweight to explode).
Ta-da!
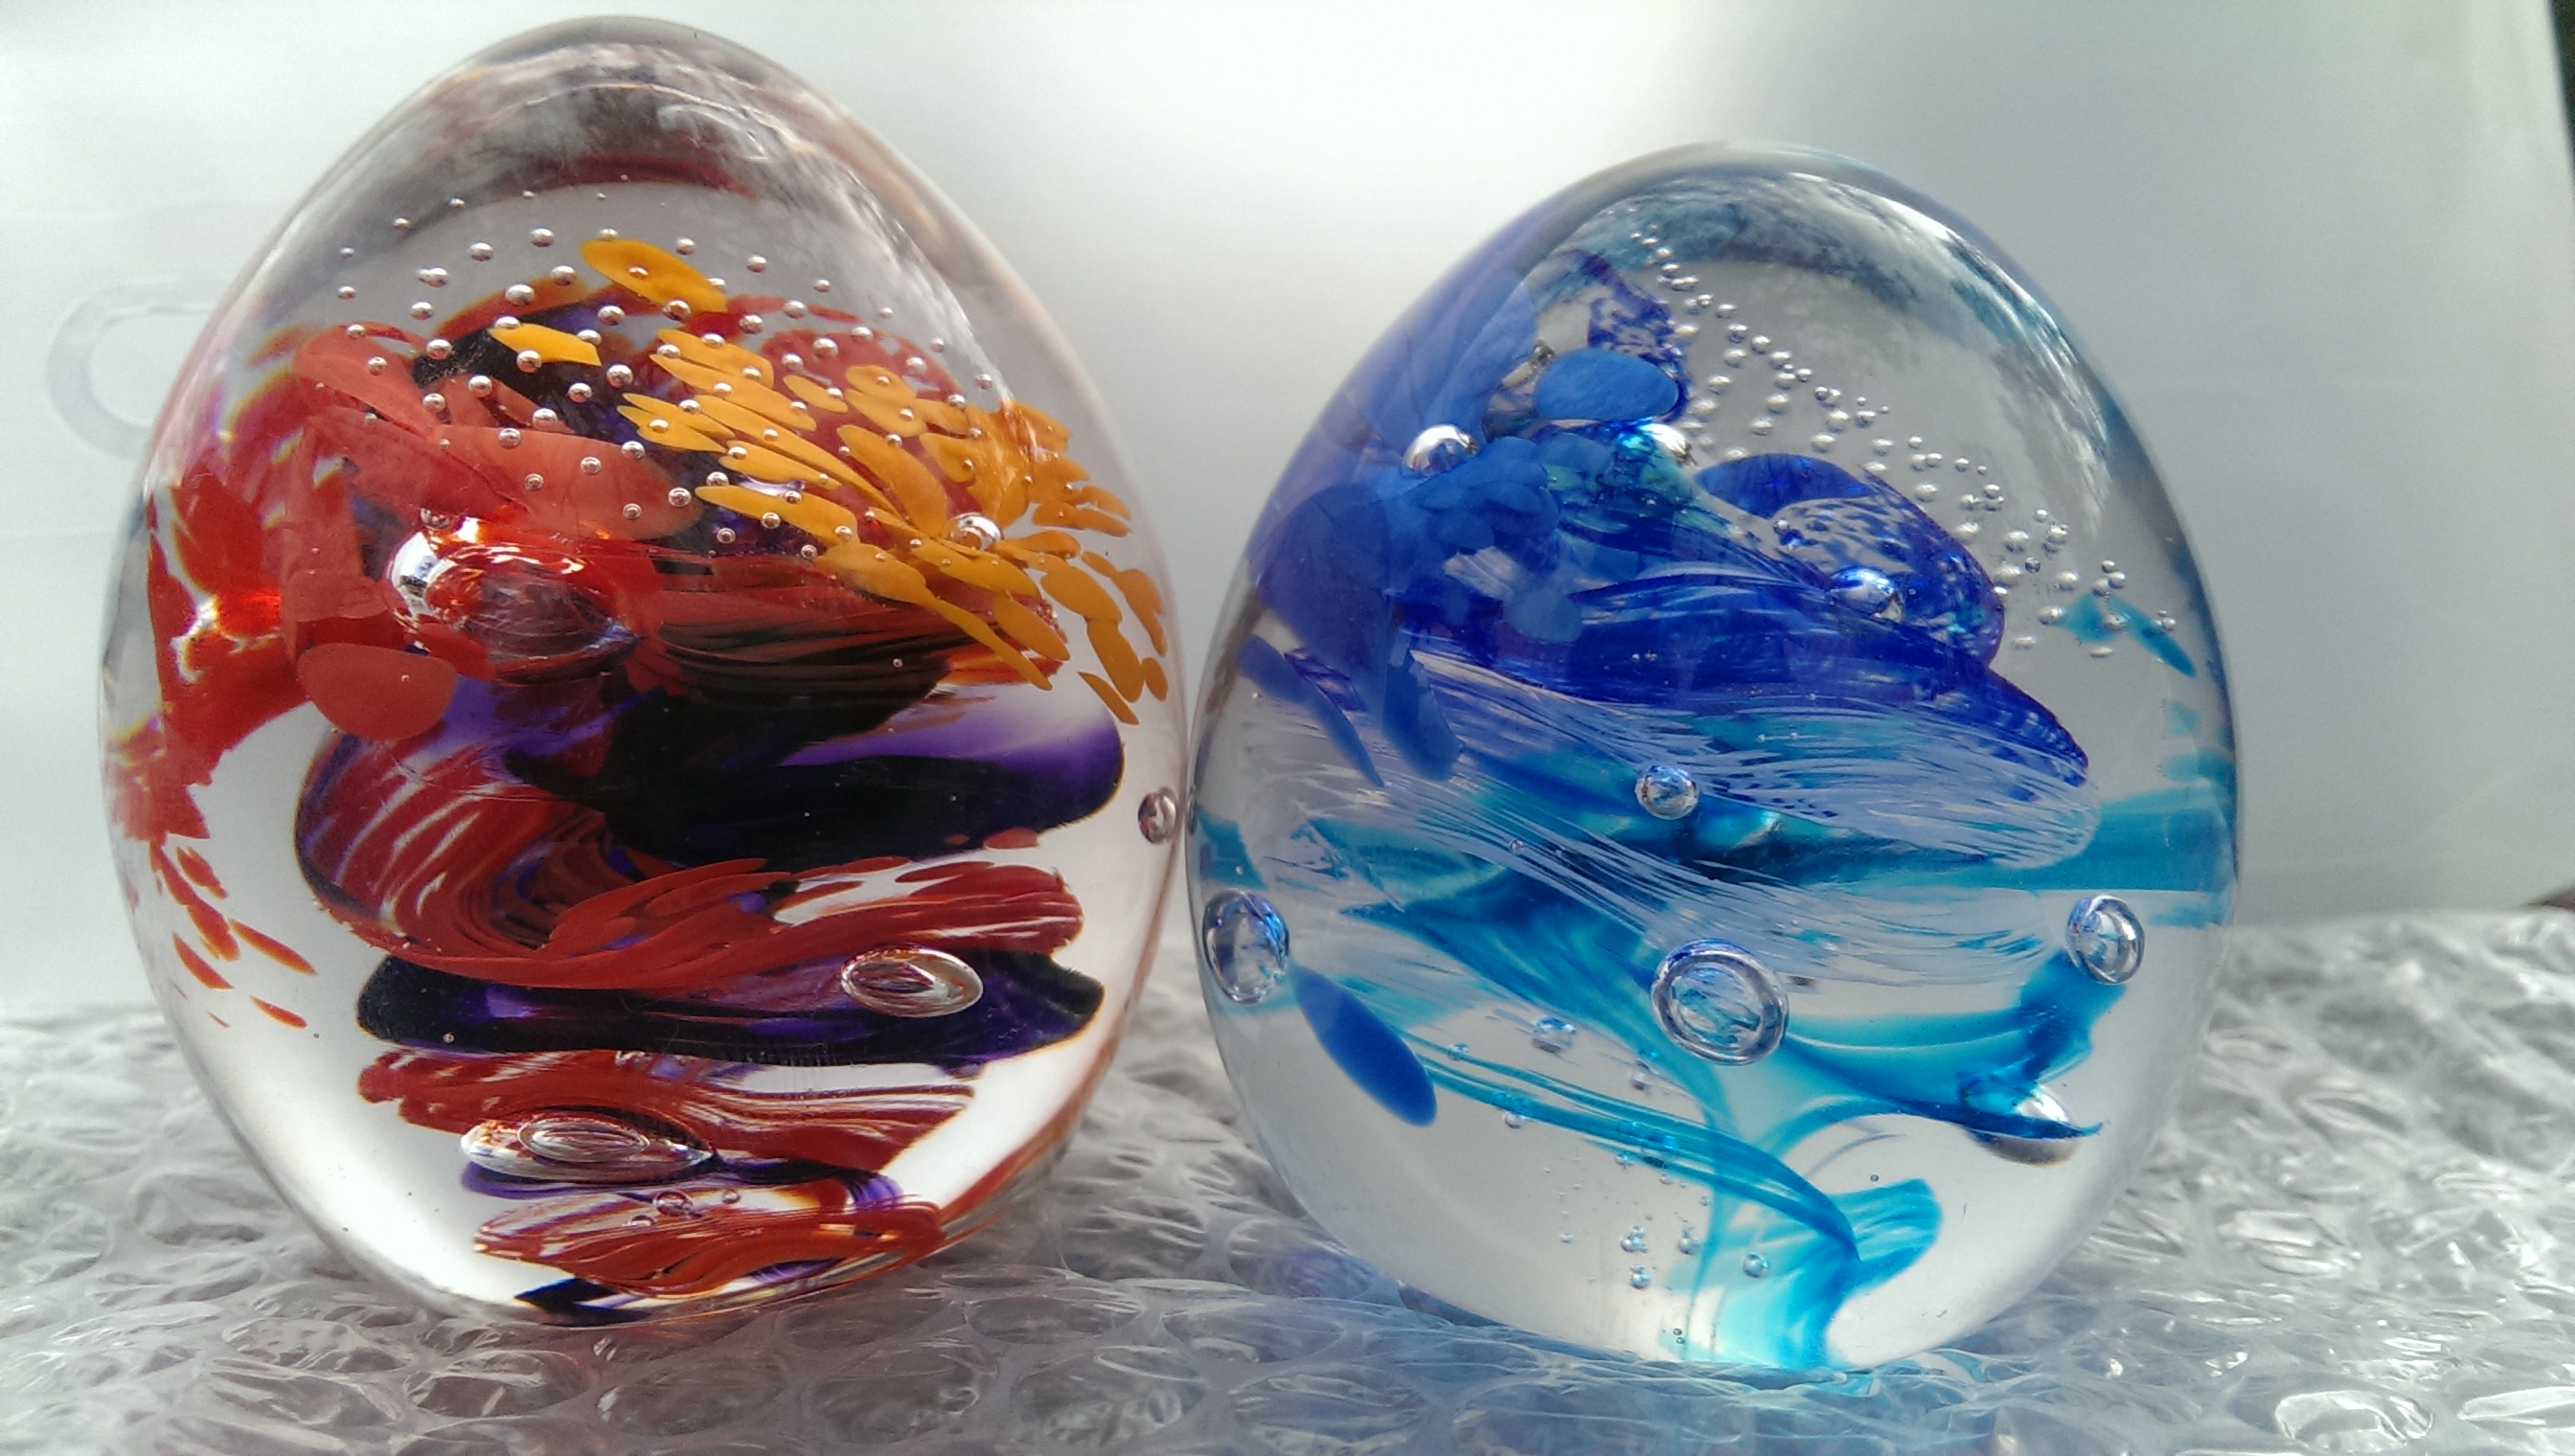
His and hers – make a guess!
I’d say “don’t try this at home,” but I’m betting you can’t afford the utility bill. ♣


Twitter Facebook Google+ StumbleUpon Reddit Pinterest